
|
|
|
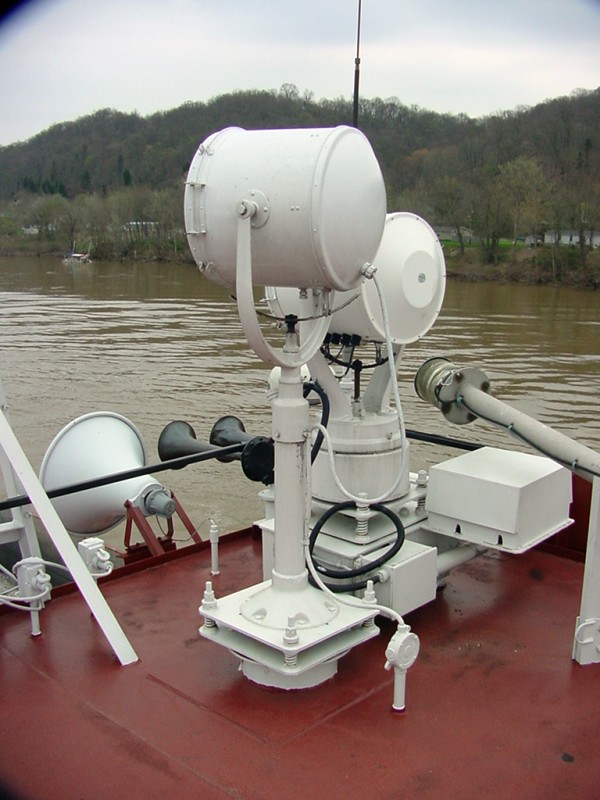
Lighting Systems Naturally, it depends upon what type of vessel - your modeling, but as a rule, most any type of vessel will have the following typical types of light systems! NAVIGATIONAL LIGHTS Here is a listing of navigation lights on board towboats. Starboard light green Port light red Stern lights 2 amber lights placed vertically 3' apart Whistle light amber... flashes with sounding of horn Makeup lights clear flood lights Range lights 2 vertical white lights atop pilot house Spotlights clear, can be adjusted from pilot house Light boat lights 2 white lights, one placed on jack staff amidships & one forward on pilot house
Popular now-a-days is the use of the long lasting fluorescent lamps in place of bulbs.
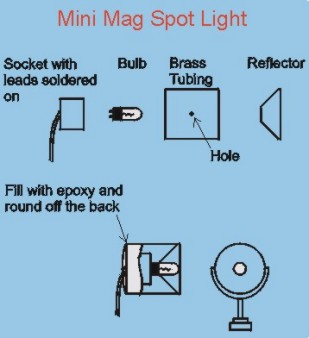
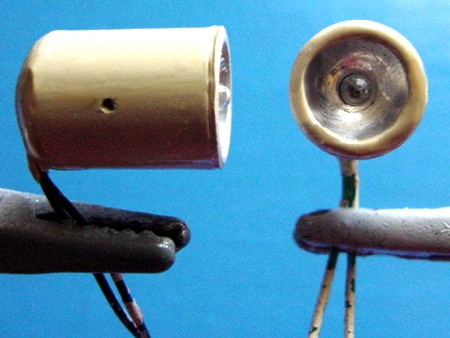
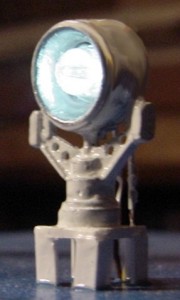
Light boat Light A white light atop the pilot house and one astern that can be seen 360 degrees that is switched on when not pushing barges. Making Spot Lights Ever wanted a better spot light than the typical grain-of-wheat bulb. How about using a Mini Mag light instead. Here's how..... First we need a couple of the small Mini Mag type lights that uses the krypton bulb. What we want to salvage out of the flashlight is the reflector, bulb, and socket. If the reflector is a little too out of scale for the boat we can cut it down a bit, but not much or the bulb will protrude out past the reflector. The most important step in getting every thing to come together and knowing what length to cut out brass tubing is adjusting the bulb in the reflector to where it focuses a beam. That way it'll throw a longer spot of light. Once the socket is removed we need a couple of wire leads soldered to the posts where the bulb plugs in. "How else are we going to get electric to it?" Next we plug the bulb into the socket place it in the reflector and hook an appropriate battery to the leads. "We don't want to go blowing a bulb now." Slide the reflector in and out till it focuses the light into a "beam" instead of a "ring". Once the "spot" is found, this is where you want the final assembly to be. Get a measurement from the back of the socket to the end of the reflector. This will be the length to cut the brass tubing. As we mentioned before, if the diameter of the reflector is a little too big we can cut it down a little. I used 1/2" tubing cut 5/8" long for my 1:48 scale spot lights. That's about as small as you can get because at that the bulb is flush with the front of the reflector. What I did to reduce the diameter was to fit the reflector into the tubing and use a "Sharpie" pen the mark around the diameter. Then I carefully used a moto-tool with a cut off disk to cut off the excess. Once the reflector is cut and the tubing is cut to length, drill a small hole in the middle of each side of the tubing. This will be for mounting the light to a base. Now it's time to glue the reflector in to one end of the tubing. Once that is done and the glue has set up, it's time to fit the socket with the bulb into the other end. Use some scrap wood to wedge the socket in line with the reflector and check the focus of the bulb one last time to be sure it's throwing a "spot". Once it's all aligned and focused, epoxy the socket into place. For the back of the spot light you can either build up epoxy to round off the back or use filler putty. You can also go two ways with this. You can have a rounded back on the light or a flat back with rounded edges, it's your option.
To make a base for the lights just take a piece of larger tubing and cut a thin slice and cut a small section out, bend tabs on the ends that will go into the holes drilled into the sides. Solder it to a length of rod and make a round base out of wood or plastic to drill into for the rod to insert into. Lights from LED's
I purchased ultra bright LED-75 LED's from All Electronics and epoxied them into the holes from the back. After it set up I coated the back of the LED with filler puddy to keep any light from shinning through the back of the light. Remember that LED's are polarized and will only work wired one way. The long lead is positive (+) and the short lead is negative (-). They operate between 3 to 3.5 volts and the ultra brights will throw a beam twenty feet away.
Navigation Lights for Barges & Tows Use tiny Mini - Led Lights, powered by a 555 timer circuit and 9 volt battery ( All parts from Radio Shack or electronics' Suppliers ). They realistically represent the Navigation Lights on Barges and Boats. Using Green, Red and "One Orange" LED - light, for the "Center of the Tow" = Flashing Lamp, which the 555 circuit flashes and operates. These afore mentioned Navigation Lights, are standard items, used on all Tows, "No Matter" - how wide in number of barges, the tow - Is. Note- there's a Blue Nav Light - Atop the Banner Flag Pole .... This is the Pilots - Gun Site, he must use to aim the tow at night, its always used and very bright. it aids the pilot in knowing if he is still in a "slide" while rounding a bend. However in a scale model, it would require a very tiny - Grain of Sand sized bulb, and almost impossible for most modelers to replicate this item! Below is a night photo of a tow that was following us.
Here is a view following behind a tow.
Wiring lights - Inside Decks & Structures This can be very easy, using small "Wooden Blocks" as Insulators, with holes drilled in them, for the wiring. In this drawing you can see - Two Diagrams, the top drawing showing a basic "Two Wire" System. Meaning single - Negative & Positive lead, is all that's used. With jumpers across the two leads for attaching power to each Deck Light or Nav light, with its wiring added - inside the Structures - of each of its Decks.
Effectively the second wiring diagram, could be expanded ( use a larger number of wires ), to work a models - entire varied system of lights & effects, which is very common practice. Using additional wires and mounted into wider - wooden insulators, with the holes for all needed wires. Of course, everything needing a fuse, and possibly some sort of voltage regulators, to operate different effects at different voltages, from a single battery. NOTE ..... Bill uses this idea to "Back Light" a models - HELM Console, plus its gauges in the pilot house It would also - if you used the multi wire arrangement, supply all the power to the lights on the Helm Roof. Hiding Wires behind the helms - wall panels, or under a false - Helm Ceiling, for examples!
MINI-LED's Whenever I can find them, I purchase mini-LED's to use on my boats. They're small enough to use on 1:96 and 1:87 scale vessels if you like.
|
 Deck Lights ... typical deck lamps,
referred to as "GUARD" lights (covered by protective - Metal & Glass Safety Frames)
, provides lighting around the deck for crew to
see to walk around at night. They use standard
light bulbs in yellow or sometimes clear.
Deck Lights ... typical deck lamps,
referred to as "GUARD" lights (covered by protective - Metal & Glass Safety Frames)
, provides lighting around the deck for crew to
see to walk around at night. They use standard
light bulbs in yellow or sometimes clear.
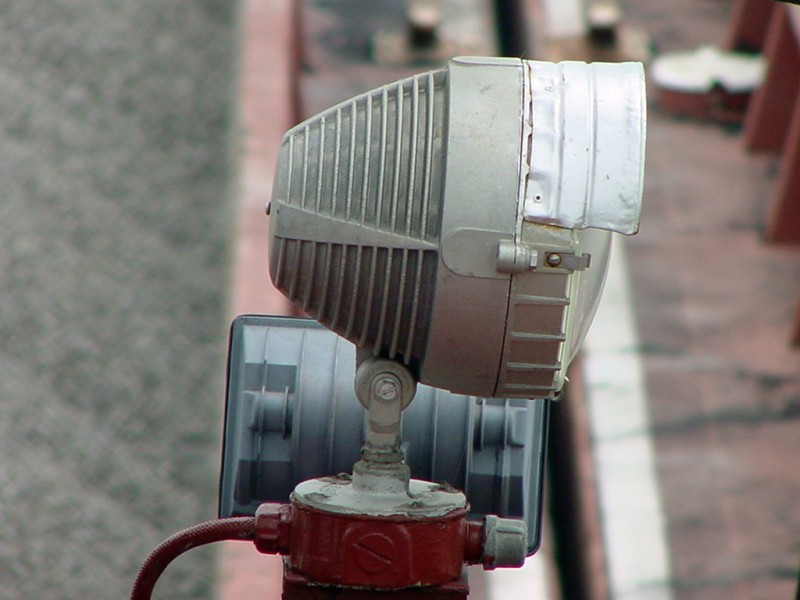
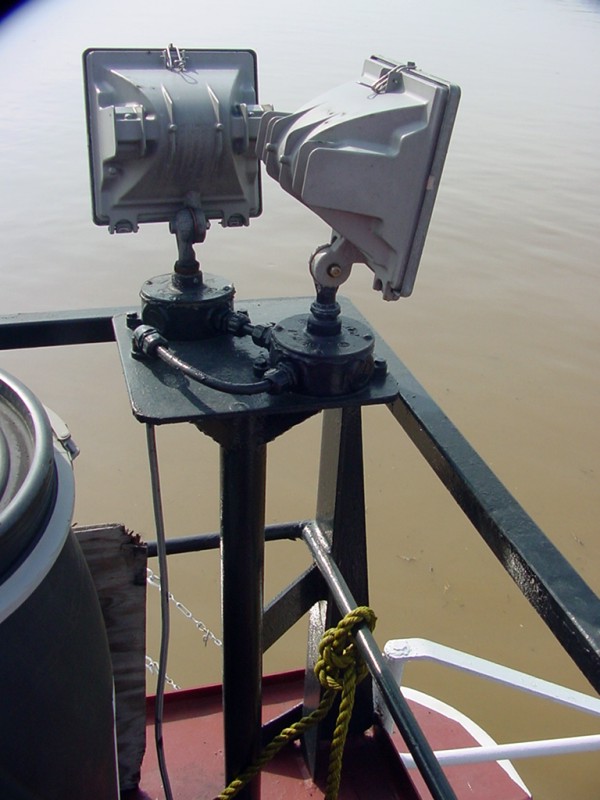


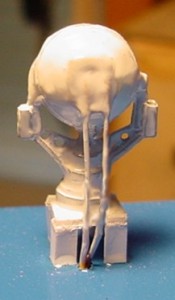 I purchased these spot lights from
 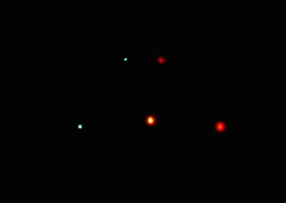 Head view....Tow coming at you.
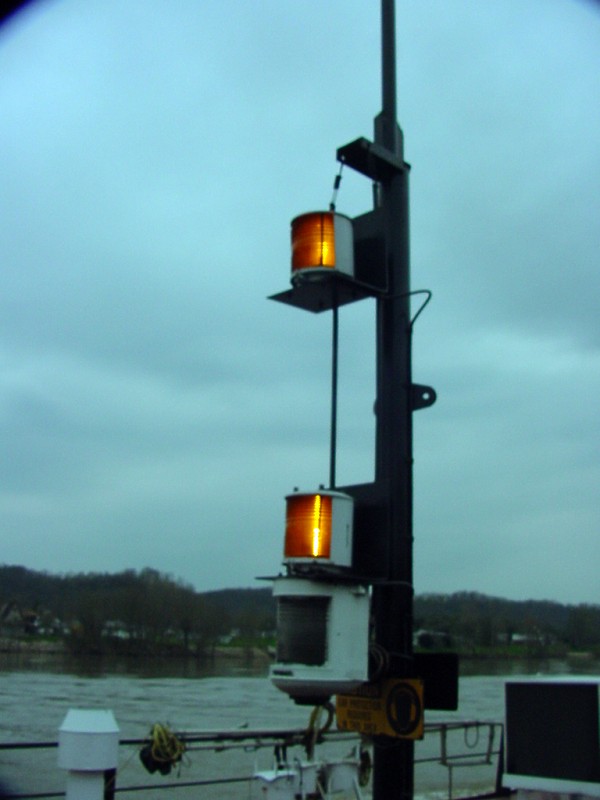
Center yellow light flashes.
Head view....Tow coming at you.
Center yellow light flashes. 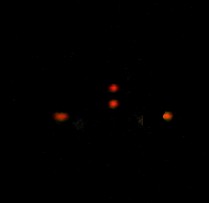 Stern view.... tow lights and
guard lights showing on each side.
Stern view.... tow lights and
guard lights showing on each side.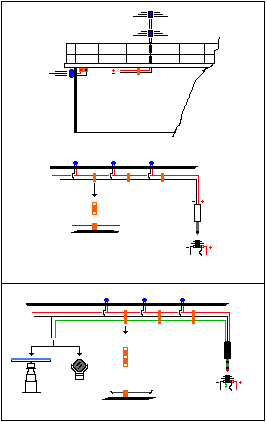 Next is a "Three Wire" system =
Red -
Green & Black = wires, allowing two different functions to be operated from the same
wiring harness, by using a "Stereo Headphone Jack & Plug" - for example, to
equip the model with this system. Wired to the battery with the ground or Negative lead -
split between the Red & Green Wires - to provide both systems - A Ground. While
operate its - Two different light systems, even with different voltages ( one circuit
using a Voltage Regulator ), for different lighting effects. For example, a Radar = that
turns, or a set of Spotlights that require a smaller voltage - say = 6 volts, that would
use a voltage regulator to reduce the battery voltage to needed amounts.
Next is a "Three Wire" system =
Red -
Green & Black = wires, allowing two different functions to be operated from the same
wiring harness, by using a "Stereo Headphone Jack & Plug" - for example, to
equip the model with this system. Wired to the battery with the ground or Negative lead -
split between the Red & Green Wires - to provide both systems - A Ground. While
operate its - Two different light systems, even with different voltages ( one circuit
using a Voltage Regulator ), for different lighting effects. For example, a Radar = that
turns, or a set of Spotlights that require a smaller voltage - say = 6 volts, that would
use a voltage regulator to reduce the battery voltage to needed amounts.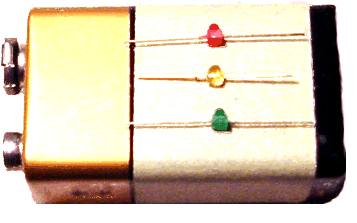 Here's
mini-LED's lying on a 9 volt battery for size comparison.
Here's
mini-LED's lying on a 9 volt battery for size comparison. 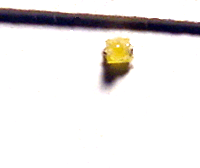 Mounted on it's back, I bend the two leads and drill two holes in the cabin wall
for the leads to go through. To simplify wiring, when you place your LED in
place, have the + lead in the same direction so when it comes time to connect
them you'll know which is which since a reversed polarity LED will not work.
Mounted on it's back, I bend the two leads and drill two holes in the cabin wall
for the leads to go through. To simplify wiring, when you place your LED in
place, have the + lead in the same direction so when it comes time to connect
them you'll know which is which since a reversed polarity LED will not work.